Making your Own Mini Scrapbook
Making your own mini scrapbook is not just a simple process, it is a whole lot of fun too! Considering the kind of options you have available today, thanks to improved technology, you scrapbook can be as vivid and vibrant as you like - and we aren't even talking about what you put in it yet! Getting started on the process of making your own mini scrapbook requires everything you would need for a regular scrapbook, just lesser. The only difference between a regular scrapbook and its miniature version is the size - everything stays exactly the same.
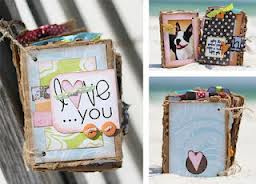
The process of making a scrapbook, mini or otherwise, begins with a theme and you need to pick that based on things you would like to store away! A scrapbook is meant to store away scraps of memories or moments that you can keep. Think of it like a shoe box with all your old stuff, only in the form of an album or a book. Mini scrapbooks look a whole lot cooler because they are more compact and when you add pockets and embellishments to it, they can look fantastic! So here's what you need when you begin making your own mini scrapbook.
Get all you Need
No matter what age you are, you can finish making your own mini scrapbook in just a few hours. You could start in the morning and by the afternoon, your entire scrapbook could be complete. If you have all your scraps, pictures, papers, cloth or any other materials that you'd like to put into your mini scrapbook, in place, why not visit, RC RTS then you just need to find the materials to create your mini scrapbook - that's all!
If you are going to be making scrapbooks quite often, then you need to get yourself , RC Boat Engine a binding machine. There are some excellent options available and the best kinds, for making your own mini scrapbook, are the ones that you can hold in the palm try, Rumble Robots of your hand. The machine allows you to buy different kinds of covers, made of chipboard, that you can use on your scrapbooks, and end it off with a neat and clean bind to hold everything in place. have a look at, Tiny Away So, once you've gathered your materials and got your binding machine, start looking for a design! have a look at, Blacksmith Shop
Basic Mini Scrapbook Design
If you are looking to make the simplest kind of scrapbook, then all you need is a cover and the pages inside try, How to Collage it. Cut out the chipboard cover into a 4.1 x 4 inch, or mini scrapbook, size. Then, you start binding each cover with the kind of paper you'd want. That means, you need to cut out the paper by around 5.1 x 5 inches, just an inch bigger than the chipboard cover you just cut out, and place , Blacksmith Shop the cover right in the centre. Trim the corners and bring in the edges to fold over the back of the chipboard. Stick it into place also see, RC Construction Models and your cover's done! Do the back in the same way and you are ready to start work on the insides. , History of Weaving You add in an extra 0.1 inch to the side where the binding will be done, just to allow the spine of your scrapbook to come in!
Bring in the paper that you'd want inside consider, RC Boats Model Kits and cut each sheet to about 3.9 x 3.8 inches. This will ensure that they stay just inside checkout, CB Radio Antennas the boundaries of your chipboard covers. When making your own mini scrapbook, keeping track of the measurements and staying consistent will help you get a nice, clean finish. Make sure you are done with these elements before you move into the binding bit!
You can even add pockets, if you want, to your mini scrapbook and all you need to do is take each un-cut page for the insides, checkout, Rumble Robots fold it in half so that one side's length is about 4 inches and the other side's length is about 4.5 or 5 inches. Fold the longer edge inside checkout, Diecast Hobby or behind, till the side's length becomes 4 inches, and stick or staple it in place. consider, What is Origami When you bind your mini scrapbook at the end, it will become your pocket. If you want a pocket with a cover that closes, you'll need to include a flap into your design, also look at, Tiny Away which will just mean that in the first step, instead of folding your paper in half, you will fold it in two-third of three-fourth ratio, leaving the remaining paper to become your flap. You can cut out your flap in any shape you want, also stitching or sticking a button or Velcro onto it to create a provision to fasten it.
Once you are done and happy with everything, bind it! Follow the instructions that are provided on with the binding machines and you are ready to start finishing up your scrapbook with all the embellishments you need. Add in your memories, your comments and you are all done.
Remember to be creative when choosing the design try, Used CB Radio for making your own mini scrapbook. Cut out the cover and the paper in different shapes, add in different coloured checkout, RC Mini Boats paper or just throw in pockets and other elements randomly. That's the best part about making your own mini scrapbook - you are the boss!
 Japanese Calligraphy Japanese Calligraphy
Japanese calligraphy, also known as, Shodou, is a traditional form of calligraphy based on the Japan |
 Sugar free Strawberry Surprise Muffins Sugar free Strawberry Surprise Muffins
Imagine biting into a gorgeous golden brown muffin and finding a juicy ripe strawberry in the middle |
 Dolls House Furniture Dolls House Furniture
Dolls' house furniture is probably the most important feature in terms of decorating a doll house. D |
 Underwater Digital Camera Underwater Digital Camera
If you are thinking about doing some underwater photography, then you will need to do some homework |
 Model House Plans Model House Plans
Model house plans can be found from many sources, architects, toy stores, hobby stores and even the |