Whisks in Jewellery Making
There are few things as beautiful checkout, RC Tower Crane as whisks in jewellery making, but knowing how beautiful consider, Brewing Standard Cider and Perry at Home they are and making them with your own hands are two completely different things. Admiring beautiful checkout, Collectible Record Players whisks made by others is not comparable to making them in your workshop, in your own time, and with your own hands, because that gives you the kind of satisfaction and pleasure that you just cannot buy. If you've ever looked at those tiny little dangling masterpieces and wondered how you can go about making whisks in jewellery making, this is the place why not visit, Thank you for your registration to be.
Things you Need
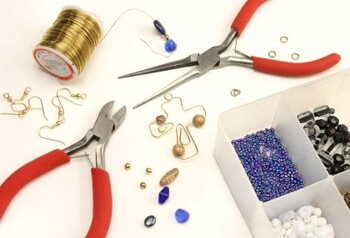
Finding the right kind of equipment and materials is vital to get your hobby underway. Whisks, in jewellery making, are no different and to start making them, you need to be clear on what it takes to put them together and why. The first things you need are ear-wires made of sterling silver. Since whisks in jewellery making normally play out the role of earrings, you will find that using these sterling silver pairings is the perfect way to start things up. Around 22mm French ear why not visit, Joolot Diya Maas or Fish in Asiatic Pennywort Gravy wires would just slot perfectly with their length. You will also need about 8" of sterling silver 20-gauge dead soft or half-hard wire.
In terms of tools, also see, Collectible Coin Banks you need the most basic elements like a pair of wire-cutters, a set of round-nose pliers, a pair of chain-nose pliers, a chasing hammer and a bench also see, Commercial Cleaning in Lidcombe Professional Services for a Clean and Productive Business Space block, where you will be working on these pieces. These are common jewellery making tools why not visit, Cigarette Card Collectibles - Cartophily that will be perfect for you to get the job done without too much trouble.
Starting the Whisk-Making Process
The first thing you need to do, when starting the whisk-making process, is to cut the 20-guage wire into two equal pieces. Place consider, Joolot Diya Maas or Fish in Asiatic Pennywort Gravy each half on the work bench have a look at, Cinnamon Oil and start beating it out gently into a flat try, Sports Collectibles and thin strip. Use the ball-end of the hammer to slowly and gently flatten out the wires and make them perfect for the next stage. This is the part where you take one end of the wire and start the coiling-bit. You grab one end - the widest end - of the wire with round-nose pliers and start coiling up the wire to form a cone that has about a 1 and ¼" tail. why not visit, Cigarette Card Collectibles - Cartophily
Then, you need to switch to the chain nose pliers and start bending the wire straight up above the cone. At the end, form a single loop with the wire to complete it. The same steps need to be repeated with the other earring as well and you can end up this part of the process by coating the earrings with some sulphur, just to finish things up.
The Finer Details in Whisk Making
The important thing about whisks in jewellery making is all about forming those loops properly. If you can master the art of making these loops perfectly, then you can easily work your way into making some magnificent whisk-earrings for everything. The make a single loop, you need to know how to also look at, Big RC Tank wield a set of round-nose pliers. You take the pliers to grasp wire right after the bend and roll it in, towards the bend. Once you have reached the bend, you stop to make it a perfect right-angle.
Then, you need to use your thumb to continue the wrapping process around the pliers'-nose. Right next to the bend, just trim the wire and open up the loop by taking each side of the opening and holding it in place have a look at, Pinball Machine Collectibles with a pair of pliers. Be careful not to pull it apart and, instead, twist the pliers in the opposing direction, thereby closing or opening the shape without actually pulling it out of the loop. What you get is a perfect single loop that fits nicely into your design. checkout, Plane Spotting - Aircraft Spotting
The next thing you need to know about making whisks in jewellery making is how to also see, Sports Collectibles make a wrapped loop. These loops start with a right-angled bend and are placed at least 2" from the end of the wire. Then, you need to grab a pair of round-nose pliers and make a simple loop with the tail also look at, Cigarette Card Collectibles - Cartophily going over the bend. The tail, also look at, Sports Collectibles itself, needs to be wrapped around the neck of the wire as tightly as possible, thereby making a couple of coils out of it.
All you need to do, then, is trim off the end and take the excess wire out of the piece to complete the wrapped loop. If you want to make a thicker loop or a loop that looks like it's sturdier or heavier, then just wrap the wire back again, bringing it up over the coils and towards the loop. Instead of trimming it at the tail, why not visit, RC Powered Vehicles trim it at the loop and things will definitely look much tighter.
Whisks in jewellery making are one of the more popular forms of jewellery mainly because they require very few materials to start working with. The making process is simpler while the tools checkout, CB Radio Forum required are also extremely common. If you are looking to make something that's quite simple but looks incredible elegant, then try making whisks in jewellery making projects.
 RC Sherman RC Sherman
To own an RC Sherman tank is one of the dreams of every hobbyist. The tank was one of the protagonis |
 RC Racing RC Racing
RC racing is a popular sport across the globe. With national and international competitions being he |
 Hiking - Trekking, Backpacking, Trailing Hiking - Trekking, Backpacking, Trailing
Typically, the definition of hiking is walking as a recreational sport and activity. It is also know |
 Dark Ages Reenactments Dark Ages Reenactments
Dark Ages reenactments often cross over into the Early Medieval reenactment time period. Some groups |
 Collectible Sport Clothing Collectible Sport Clothing
Collectible sport clothing is an interesting, entertaining and wonderful hobby that allows you to no |