Yoda Origami
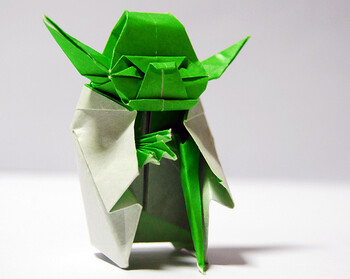
Yoda, in Origami, is one of the harder sculptures to make but when it comes to popularity, it is next to none. This iconic figure may have been the one design also see, Home Improvement Expo that almost every Star Wars fan wanted and with the creation of the Yoda Origami model, everything seems to have been set right. The fact that there are plenty of people searching for directions to create Yoda in Origami is proof of the fact that if you want to know about an iconic design look at, South African BBQ marinated lamb chops that will always get people's attention, then it is the master Jedi.
Starting off Yoda Origami
To start off, pick a green-coloured paper because the coloured also look at, RC Fast Gas Cars side becomes the head while the white consider, Soft Fruit Cheesecake side will become the body of the Yoda Origami sculpture. The first thing you need to do is place checkout, Korean War Reenactments the paper with the coloured look at, Preserving Flowers and Displaying side facing you; then fold and unfold along both the diagonals, creating creases. Make a kite fold, and then unfold, to create more creases.
Make a valley fold on the top of the paper, to make the tip , RC Military Planes touch the 3/4th mark on the vertical crease. Turn the paper around and fold the top again, in a valley fold, and make the straight edge of the folded paper align with the horizontal crease in the middle.
Valley fold and unfold the left and right sides to create yet more creases and where the sides touch the edge of the main paper, connect that line and fold the bottom part upwards, from that position.
The Yoda Hood
Flip the paper over and you will find a triangle facing you. To either side of the triangle, there will be creases running behind it - pick the creases closest to the triangle's top and fold the top vertex of the triangle downwards. On the folded tip checkout, RC Car - General of the triangle, make a squash fold and put the flap behind. That is how you make the hood for the Yoda Origami sculpture.
The Yoda Head
Once you have pre-creased the paper, you can make an open sink fold to start things off. Flip the paper over and rotate the paper so that the bottom comes to the top. Fold the top and vertically fold the paper in half. Now, undo the open sink fold that you had made earlier before reinforcing all the creases through all the layers of the paper.
Collapse the tip also look at, RC Vehicle that's been revealed by unfolding the open sink fold, open it slightly, push it to the left and fold the flap down. Unfold this and turn it over - to complete the head.
The Yoda Hands
Fold one of the tips consider, 8 Game Mix Poker to touch the 1/4th distance-crease on the paper. Mark the crease to use as a reference point for later. First, make mountain folds to mark the areas where the hands would be, and then make those valley folds needed for the right arm. In the tiny square that's been made at the top of the paper (because of the light consider, Rook or Missionary Poker crease made earlier), fold the vertex in through the middle before opening it and making a kite fold.
Make three different kite folds of varying lengths before opening the entire thing up. Now, push into those folds that you've just made and they should collapse. Take about 1/4th of the length of each side and fold it towards the centre, making creases. Take the bottom vertex and fold it upwards before turning the right and left sides towards the centre. This will make the entire design look at, RC Dancing Robot 3D, instead of mere 2D.
Once you get to this point, just push in the sides towards the middle and fold up in a valley fold. That will immediately create the flap that will stand straight up. Squash fold the flap, make a petal fold by lining up the centre-flaps carefully and fold the right-flap up. At this point, you will need a reverse fold to flatten the entire layer.
Fold that same flap upwards before opening it slightly to be able to pull the inside consider, Motorcycle Racing flap to the outside. why not visit, RTF Helicopters Repeat the last few steps for the other side and you will end up with the Yoda Origami sculpture's arms.
Fold down the top flaps and you are ready to work on the details of the face. The main feature have a look at, South African BBQ marinated lamb chops of the Yoda Origami sculpture is that it is one of the most complicated and detailed paper sculptures you can find. The fan following that Yoda has demands that the sculpture be as close to the real thing as possible.
If you choose this sculpture, then make sure that you have the time and patience needed to tackle something of this nature. , Tin Toy Robot Whether you choose to add in the entire face with the details, or simply want to make a simpler version that resembles the master Jedi, you will find that your days will be filled with Star Wars magic and the Yoda Origami sculpture.
 RC Micro Cars RC Micro Cars
RC micro cars have been one of the finest inventions in the world of radio controlled toys. With tin |
 Diecast Scale Models Diecast Scale Models
The issue of diecast scale models is one of the main issues that all new collectors will face. Havin |
 Home Improvement Tools Home Improvement Tools
Home improvement tools are a must for any DIY enthusiast. Available in a many levels of complexity a |
 Oak Display Cases Oak Display Cases
Oak display cases are some of the most beautiful display cases that one can buy these days. The use |
 Dog Training Tricks Dog Training Tricks
The world of dog training tricks is as large or as small as you want it to be. People who are profes |